how to add admin to Facebook page
Do you manage a brand’s Facebook page? You might manage a personal website for you and your pals.
Alternatively, do you manage a public Ariana Grande fan page? (Or, you know, a page for a hobby you have personally.)
It might be challenging to manage a Facebook page on your own.
To manage your page and keep things organized, you may thankfully add administrators or admins.
You may require a team of individuals who can edit and publish material, look at data about your followers, and more if you manage a brand page or your own personal page on Facebook.
Once you’ve established a page, Facebook enables you to invite users with varying levels of access.
An admin is a role that has the most permissions.
Making your Facebook page as effective as possible is easy to do.
Here’s how to add someone as an administrator to your Facebook page, as well as what occurs when you do so for another user’s account.
What a New Admin Means for Your Facebook Page?

When you create a Facebook page, you’re automatically its administrator, which lets you control everything on it.
Among other things, you can add buttons, create ads, respond to comments, post from Instagram to Facebook, and assign page roles.
You actually have five roles to choose from on a Facebook page:
- Admin
- Editor
- Moderator
- Advertiser
- Analyst
The admin is in charge of all functions and is at the top of the hierarchy, allowing each user to use certain features on the website.
Adding a Facebook administrator is a significant event, in other words.
Make sure the new administrator is trustworthy and easy to work with.
Avoid conflict if you don’t want to get booted off the page.
Choosing the correct personnel for the different jobs assures the page’s smooth functioning and security.
How to add someone as an admin on your Facebook page?
1. Go to your Facebook page. On the left sidebar menu, scroll down and click “Settings.”
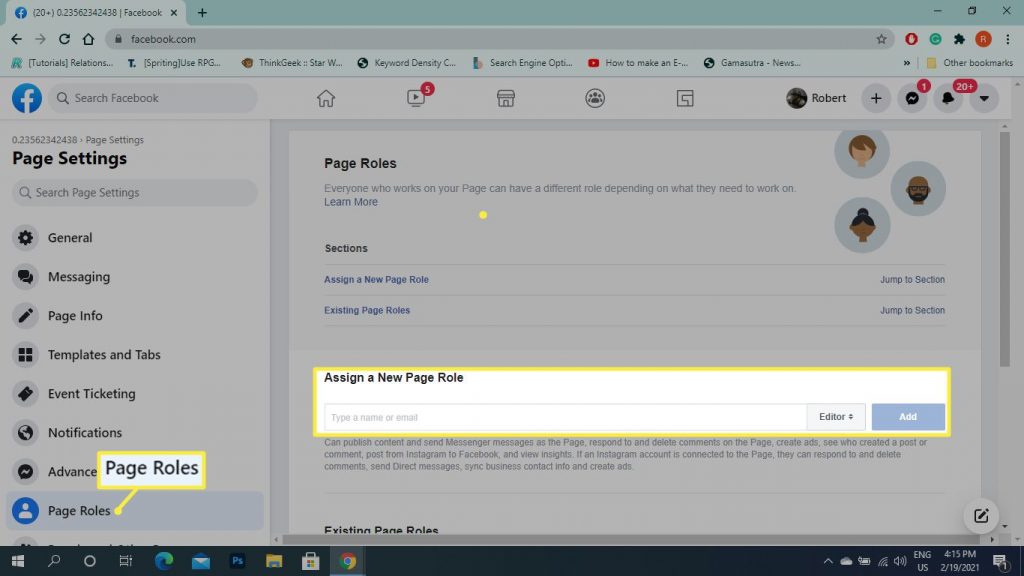
2. This will take you to the general Page Settings menu. On the left sidebar menu, scroll down and click “Page roles.”
3. In the “Assign a New Page Role” section, start typing the name of the person you want to assign to the page. The dropdown menu will offer you suggestions and you can choose the person you want from there.
4. Click the box next to their name to reveal a dropdown menu of role options.
5. In the dropdown list, select the “Admin” option.
6. A reminder will pop up that reads: “If you’re adding a new admin to your Page, please keep in mind that they’ll have the same permission as you do to make changes to this Page.”
7. Once you have the right name, click “Add.” Facebook will then prompt you to re-enter your password to make sure it’s you that is making the change.
8. Under “Existing Page Roles,” the person’s name will now show up with a red “pending” message next to it.
9. Once the person receives the notification, they can accept and their role will show up under the “Existing Page Roles” section. This shows you each person on your page, categorized by their permissions. For example, you can have one person under admin and one person under the editor.
Additionally, you can modify each user’s rights using this menu. Therefore, if you already have someone set as an Editor, you can make them an admin by selecting the “Edit” option.
A drop-down menu will display when you click “Edit,” allowing you to select a different role for that person. By doing this, you can avoid having to add them again to your page.
This section of the menu can also be used to delete users from your page.
A Facebook login that is not connected to a personal profile or account is known as a gray account. Before we made it necessary for people to have a personal Profile in order to create, manage, or run advertisements on a Page, people could manage their Pages using gray accounts.
A Facebook Page owner is the person who registered the domain name and set up the Facebook Page. An admin is a person who has been given permission to manage the page. Admins can add or remove other admins, publish posts, and manage comments. Only page owners can make changes to the page settings.
If you enjoyed this article please share this article, it will go a long way for us. Also, subscribe to our newsletter, follow us on Facebook, Twitter, Pinterest, Google News, and Instagram for more
“Please leave your comments. Let’s us know what you think, this helps us improve our next article”
Source: fifty7tech.com