
")
how to make your Facebook private
It’s understandable that you wouldn’t want all of your information made public given that Facebook makes so much of your personal information available, including birthdays, employment details, and family updates.
It’s really simple to take more control over what Facebook users, especially those who aren’t your friends, see.
Make your Facebook private by following these simple steps.
By default, Facebook is set to make all of your information public.
What if, though, you want more control over who may view your profile on Facebook and keep it private from those who aren’t your friends? Is it possible to alter the default settings for your account?
To keep your posts, Friends list, profile details, and albums private on Facebook follow the instructions in this page.
The steps are specific to using Facebook on a desktop.
How to Make Your Facebook Profile Private?

Make sure all of your posts are set to only be visible to your friends in order to begin pushing your profile toward total privacy.
- Select the drop-down arrow in the top-right corner of the Facebook screen after logging into your account.
Pick “Settings & Privacy” from the drop-down menu that opens, then pick “Settings” once more.
Search for and select the “Privacy” option on the left side of the Settings screen when it appears.
2. Look for the area under “Your Activity.” You may choose things like who can see your posts or the pages and people you follow from this page.
Who can view your future posts is listed next?
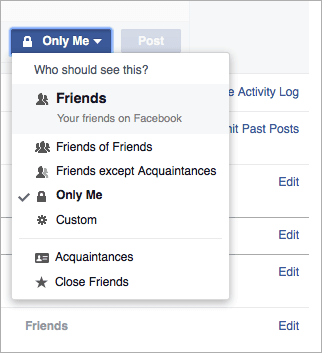
Make sure you click the “Edit” option to change it from “Public” to “Friends” if it currently reads “Public” so that only people on your friends list can view what you write.
You can take things a step further by selecting “Pals except” and adding friends who won’t be able to read any of your posts.
Alternatively, you may select “Specific friends” to limit who sees your posts.
Compared to the broader “Friends,” the latter two alternatives are unquestionably more private, but they also demand more manual setup.
3. You may also go through all of your earlier posts and “Limit the audience for posts you’ve shared with friends of friends or Public” in the past if you want to be extra cautious.
If you select this option, only your friends will be able to see all of your prior posts.
Thereafter, neither friends nor non-friends (Public) will be able to view the post.
4. There is another setting for “Who can see the persons, Pages, and lists you follow” directly beneath the one in the previous step.
By setting this option to “Only me,” you are taking the best feasible precaution to guarantee your privacy.
However, each of those offers only a modest amount of privacy.
You can also set it to the same set of groups in step four with Friends, Friends except, Specific friends, etc.
The ideal option here is “Only me,” as you can be confident that no one will be able to see a significant portion of your profile that way.
How to Limit Your Contact Options.
It’s time to lock down your friends list the same way you did with your posts in the previous phases.
- Make sure “Only me” is selected under “Who can see your friends list?” before moving on.
Again, you have a few options here, but selecting “Only me” is the best for your piece of mind if privacy is your top concern.
2. You should manually adjust a handful of these other settings to “Friends” or “Only me.”
Using the email address you gave, who can search you up?
Since they probably already know your email address, it’s better to choose “Friends,” but if you want complete anonymity, you can also select “Only me.”
Using the phone number you supplied, who can find you? This is a continuation of the previous notion.
The most private setting is “Only Me,” but “Pals” is probably fine because your friends presumably already know your phone number.
“Do you want external search engines to link to your profile?” This is unquestionably a no.
You don’t want Google, Bing, or other search engines to be able to find your profile.
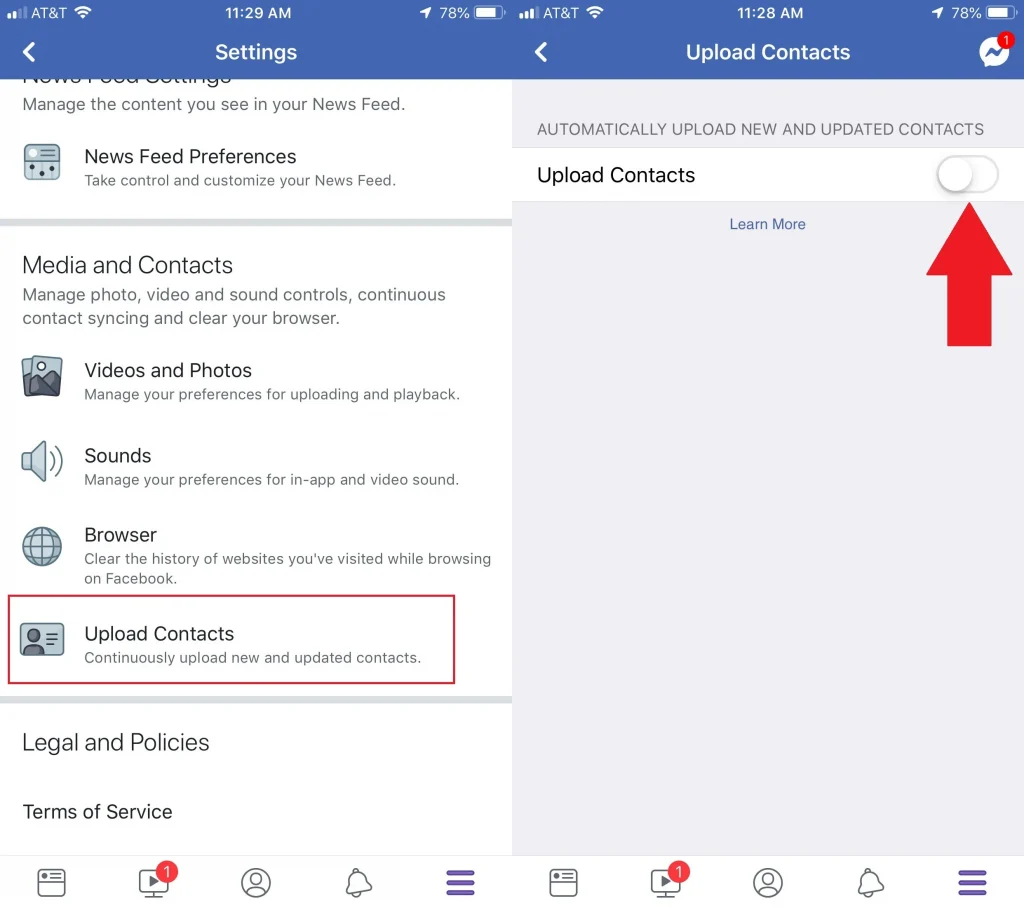
How to Change Facebook App’s Privacy Settings?
Your Facebook can be easily made private on the mobile app, too.
- Open the Facebook app on your iOS or Android smartphone or tablet to start.
You can tap on the three-line menu at the bottom right of the screen.
After finding the “Settings & Privacy” menu option, scroll down and tap it to bring up a list of options. The first item on the list should be “Settings.”
Tap it, then scroll down until “Privacy” appears.
2. Select the first choice under Privacy, “Privacy Settings,” and tap the first choice, “Check a few key settings.”
3. Who can view what you share is listed in the first box on the left of this menu.
To access the “Friends and Following” settings, tap on this and then “Continue.”
The settings for “Who can see your friends list on your profile” should both be changed here to “Only me,” and “Who can see the persons, Pages, and lists you follow.”
4. Once the necessary adjustments have been made, select Next and change “Future Posts” and “Stories” to “Friends” for the highest level of privacy.
You can now see “Limit Past Posts” to take non-friends out of previously tagged photographs or posts, just like on the desktop.
To save all of the changes and return to your Facebook stream, tap Next once more.
If you enjoyed this article please share this article, it will go a long way for us. Also, subscribe to our newsletter, follow us on Facebook, Twitter, Pinterest, Google News, and Instagram for more
“Please leave your comments. Let’s us know what you think, this helps us improve our next article”
Source: fifty7tech.com

